Our MIS team is compiling a list of frequently asked questions (FAQs), tips and reference materials regarding our new Avaya phone system and its associated applications and physical desk phones. Click on any of the questions or items below to expand.
— FOR ALL USERS —
How do I install the Avaya Cloud app on my SCC-supplied PC or laptop at home?
Please follow these steps:
- Ask MIS to send over an Avaya email invite to you (if you haven’t already received it)
- Close out of your Work Computer icon session for now (only applicable to staff)
- Then obtain the Avaya Cloud client from the link below:
https://www.ringcentral.com/apps/avaya-cloud-office/aco-app?utm_source=app-gallery&utm_campaign=featured
- Log in using the credentials you used when activating your account from the Avaya email invite
When you are working from home instead of the office, please perform these additional steps (applicable to staff, and only if you’re working from both your home and in the office):
- Launch your Work Computer sesion
- In your work PC session, right-click on any Avaya apps that are running and choose Exit or Quit to close them out:

- This will prevent these apps from opening from inside your work PC session. The Avaya Cloud app must be running from your SCC-supplied machine at home in order to hear the caller and vice-versa.
How do I install the Avaya Cloud Phone app and keep it in the foreground over my work PC session?
On your SCC provided equipment at home:
- Close out of your Work Computer icon session
- Open Gmail locally on your SCC provided equipment.
- You can obtain the Avaya Cloud Phone app from the link below:
https://www.ringcentral.com/apps/avaya-cloud-office/aco-phone
- Click the button that says “Download for PC”
- Once the app has fully downloaded, you can click on the bottom left link in your browser window to start the installation.
- Click “Next” at the Welcome screen
- Check the “I accept…” box on the license agreement, then click “Next”.
- Click the Install button (installation typically takes less than a minute)
- Click “Finish” when it completes.
The Avaya Cloud Phone app will now load and you should get a Windows Defender Firewall message:
- Place a check mark (if not already checked) in the “Private networks, such as my home or work network”.
- Remove the check mark (if not already unchecked) in the “Public networks, such as those in airports and coffee shops…”.
- Click the “Allow access” button to accept these settings.
Click the “Sign In” button when the Avaya Cloud Phone app launches:
- Click the Email option at the bottom.
- Enter in your email address and the password you assigned yourself during your initial Avaya activation.
A brief tour is typically presented. We recommend that you go through the tour to get more familiar with this app. Now let’s complete your setup:
- Set your area code to 813 and click the “Accept” button.
- NOTE: Should you receive an error message about licensing and deauthorization, contact MIS@SCCMAIL.ORG, we can fix that for you.
- The Avaya Cloud Phone app will appear.
- To set the app to always stay on top, you must go to the gear icon (Settings):
- Choose “General” from the right column.
- In the right column, look for “Keep app in the foreground” and move the switch to the right (it will turn red). Then click “Apply” at the top.
How do I know my Avaya Cloud app is active?
In the upper right corner of the Avaya Cloud app is your profile picture (typically your first and last initials of your name or a picture you may have uploaded). You will see a green dot meaning you are available to take calls and that also means you are active. If you are on DND, it will be a red circle with a line through it and if you are “Invisible” the dot will be gray (just means you aren’t showing any status to staff and volunteers but still can receive calls). You can also reach out to MIS@sccmail.org and we can check for you.
Why am I receiving a 'Service unavailable' error message when logging into my Avaya Cloud Phone app?
This can sometimes occur when using your Google credentials to log into the Avaya Cloud Phone app. So we recommend logging out of your Avaya Cloud Phone app by clicking the Gear icon in its bottom toolbar (rightmost icon) and then clicking the Logout button. Then click the Sign In button and click the Email circle at the bottom. Now log in using your @sccmail.org email address and password you used when initially activating your Avaya account.
How do I fax from my Avaya Cloud or Avaya Cloud Phone app?
- Print out your document with the Adobe PDF or Microsoft PDF printer and then save it.
- Note: If the document you want to fax is already in a PDF or Word document, then you can skip this step.
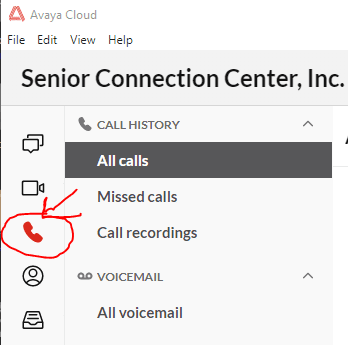
- From the Avaya Cloud app, click on the Telephone handset icon on the left:

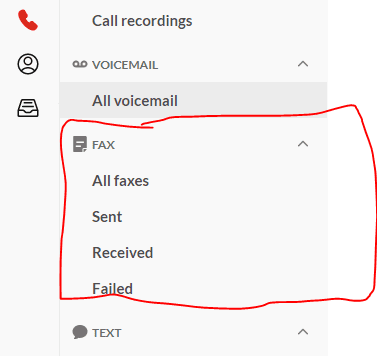
- Look for the “FAX” section as shown below:

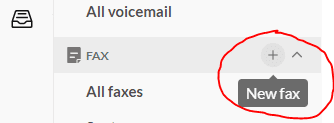
- If you hover your mouse over the “FAX” label, a “+” will appear:

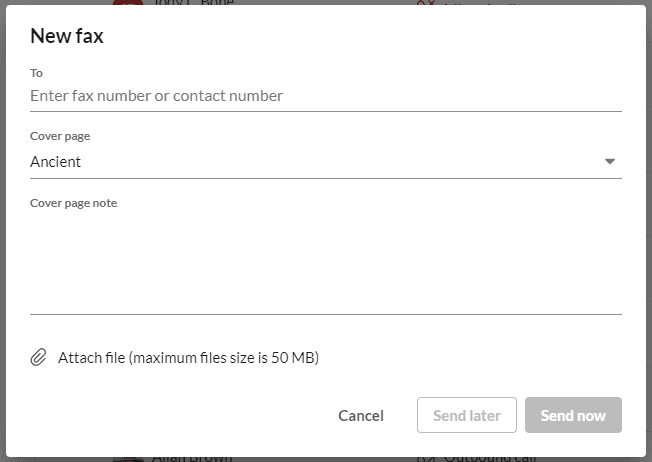
- Click on the “+” and fill out the information:

To: {Enter the fax number you are faxing to}
Note: You do not need to enter an “8” for an outside line.
Cover page: {use your discretion}
Cover page note: {self explanatory}
- To attach the pages you want to send, click on the Paper Clip icon, choose your file or files.
Finally click the “Send now” button.
Is there a user guide to learn more about the features of our new Avaya Cloud phone system?
Yes there is! Please click on the link below to open the official Avaya Cloud Office user guide:
Can I drop the last caller after adding them into a three-way conference call?
Unfortunately we confirmed with Avaya Support on 5/5/2021 that once another caller is connected into a three way conference call, the only way to have one remaining user on the call is to inform the other user to drop the call on their end.
How do I connect a physical Avaya phone at home?
There is a set of steps along with photos available dedicated to this:
Are there any user guides for the physical Avaya phone?
We checked online and found both quick start and full guides for the Avaya J169 phone:
— FOR CALL QUEUE SUPERVISORS —
What are our agency's shared mailboxes and where do notifications go?
Our message-only extensions (shared mailboxes) along with shared email accounts that new messages notifications are sent to are provided below.
Note that Google Group email addresses cannot be used for Avaya notifications (via MIS testing); they must be actual Google accounts accessed via delegation.
- General Delivery x2199 – operator@sccmail.org
- Helpline English x2110 – ir@sccmail.org
- Helpline Spanish x2113 – ir@sccmail.org
- LTC Advanced x2121 – ltc@sccmail.org
- LTC English x2111 – ltc@sccmail.org
- LTC Spanish x2112 – ltc@sccmail.org
- SHINE Highlands,Hardee, Other x2104 – shine.users@sccmail.org
- SHINE Hillsborough x2101 – shine.users@sccmail.org
- SHINE Manatee x2103 – shine.users@sccmail.org
- SHINE Polk x2102 – shine.users@sccmail.org
- SHINE Spanish x2650 – shine.users@sccmail.org
Filters are set up in some of these shared accounts to move new notifications into applicable labels off to the left as to not interfere with other messages which appear in these shared Google accounts.
How can I monitor calls from my specialists (agents)?
From a call queue manager’s Avaya phone (physical or cloud or cloud phone), these are the codes you can dial to monitor one of your agent’s calls:
Press Star (*) and then 80 – Silent Monitoring (you can hear the call, but no one can hear you)
Press Star (*) and then 81 – Whisper/Coach (you can hear the call and only the specialist can hear you)
Press Star (*) and then 82 – Barge (you can hear the call and both parties can hear you)
Press Star (*) and then 83 – Take Over (you and the caller will only be on the call; specialist exits)
For official diagrams and for more information, please click on the link below:
https://onecare.avaya.com/AvayaCloudOffice/kb/public/DOCS100750&viewlocale=en_US
How do I run call data reports and live monitor our assigned call queues?
All ADRC and SHINE call queue managers have been provided with a license to the RSI Shadow platform. Each manager was set up with their own department dashboards. If you are a call queue manager and do not have access to the RSI Shadow system, please reach out to MIS@sccmail.org.
We’ve uploaded the initial RSI training video up on Google Drive, and it can be played by clicking here.
Note that the above link has only been made accessible to SCC employees. If you work for another agency, etc., please request access to this video by emailing MIS@sccmail.org.
Is there more than one DND status option to allow specialists to indicate why they are on DND status?
Unfortunately we confirmed with Avaya Support on 4/29/2021 that only one DND status is available; simply on or off DND 🙁
If MIS is not available to assist me, are there support options directly from Avaya?
We ask that you request assistance from MIS first as we may know the answers to your Avaya questions; however, you can reach out to Avaya directly if MIS is either unavailable or if MIS recommends that you do so. Here are the support options Avaya has provided us:
- Send an email to ACOSupport@Avaya.com
- Go to https://onecare.avaya.com/AvayaCloudOffice, login with your Avaya credentials, and then submit a support ticket.
- Call Avaya at 1-866-AVAYA-45
Avaya live technical support is available from 8am-8pm ET.
We will continue to add answers to frequently asked questions, documents and steps as time permits. Thanks, SCC MIS 🙂
Please follow these steps:
- Ask MIS to send over an Avaya email invite to you (if you haven’t already received it)
- Close out of your Work Computer icon session for now (only applicable to staff)
- Then obtain the Avaya Cloud client from the link below:
https://www.ringcentral.com/apps/avaya-cloud-office/aco-app?utm_source=app-gallery&utm_campaign=featured - Log in using the credentials you used when activating your account from the Avaya email invite
When you are working from home instead of the office, please perform these additional steps (applicable to staff, and only if you’re working from both your home and in the office):
- Launch your Work Computer sesion
- In your work PC session, right-click on any Avaya apps that are running and choose Exit or Quit to close them out:
- This will prevent these apps from opening from inside your work PC session. The Avaya Cloud app must be running from your SCC-supplied machine at home in order to hear the caller and vice-versa.
On your SCC provided equipment at home:
- Close out of your Work Computer icon session
- Open Gmail locally on your SCC provided equipment.
- You can obtain the Avaya Cloud Phone app from the link below:
https://www.ringcentral.com/apps/avaya-cloud-office/aco-phone - Click the button that says “Download for PC”
- Once the app has fully downloaded, you can click on the bottom left link in your browser window to start the installation.
- Click “Next” at the Welcome screen
- Check the “I accept…” box on the license agreement, then click “Next”.
- Click the Install button (installation typically takes less than a minute)
- Click “Finish” when it completes.
The Avaya Cloud Phone app will now load and you should get a Windows Defender Firewall message:
- Place a check mark (if not already checked) in the “Private networks, such as my home or work network”.
- Remove the check mark (if not already unchecked) in the “Public networks, such as those in airports and coffee shops…”.
- Click the “Allow access” button to accept these settings.
Click the “Sign In” button when the Avaya Cloud Phone app launches:
- Click the Email option at the bottom.
- Enter in your email address and the password you assigned yourself during your initial Avaya activation.
A brief tour is typically presented. We recommend that you go through the tour to get more familiar with this app. Now let’s complete your setup:
- Set your area code to 813 and click the “Accept” button.
- NOTE: Should you receive an error message about licensing and deauthorization, contact MIS@SCCMAIL.ORG, we can fix that for you.
- The Avaya Cloud Phone app will appear.
- To set the app to always stay on top, you must go to the gear icon (Settings):
- Choose “General” from the right column.
- In the right column, look for “Keep app in the foreground” and move the switch to the right (it will turn red). Then click “Apply” at the top.
In the upper right corner of the Avaya Cloud app is your profile picture (typically your first and last initials of your name or a picture you may have uploaded). You will see a green dot meaning you are available to take calls and that also means you are active. If you are on DND, it will be a red circle with a line through it and if you are “Invisible” the dot will be gray (just means you aren’t showing any status to staff and volunteers but still can receive calls). You can also reach out to MIS@sccmail.org and we can check for you.
This can sometimes occur when using your Google credentials to log into the Avaya Cloud Phone app. So we recommend logging out of your Avaya Cloud Phone app by clicking the Gear icon in its bottom toolbar (rightmost icon) and then clicking the Logout button. Then click the Sign In button and click the Email circle at the bottom. Now log in using your @sccmail.org email address and password you used when initially activating your Avaya account.
- Print out your document with the Adobe PDF or Microsoft PDF printer and then save it.
- Note: If the document you want to fax is already in a PDF or Word document, then you can skip this step.
- Note: If the document you want to fax is already in a PDF or Word document, then you can skip this step.
- From the Avaya Cloud app, click on the Telephone handset icon on the left:

- Look for the “FAX” section as shown below:

- If you hover your mouse over the “FAX” label, a “+” will appear:

- Click on the “+” and fill out the information:

To: {Enter the fax number you are faxing to}
Note: You do not need to enter an “8” for an outside line.
Cover page: {use your discretion}
Cover page note: {self explanatory}
- To attach the pages you want to send, click on the Paper Clip icon, choose your file or files.
Finally click the “Send now” button.
Yes there is! Please click on the link below to open the official Avaya Cloud Office user guide:
Unfortunately we confirmed with Avaya Support on 5/5/2021 that once another caller is connected into a three way conference call, the only way to have one remaining user on the call is to inform the other user to drop the call on their end.
There is a set of steps along with photos available dedicated to this:
We checked online and found both quick start and full guides for the Avaya J169 phone:
Our message-only extensions (shared mailboxes) along with shared email accounts that new messages notifications are sent to are provided below.
Note that Google Group email addresses cannot be used for Avaya notifications (via MIS testing); they must be actual Google accounts accessed via delegation.
- General Delivery x2199 – operator@sccmail.org
- Helpline English x2110 – ir@sccmail.org
- Helpline Spanish x2113 – ir@sccmail.org
- LTC Advanced x2121 – ltc@sccmail.org
- LTC English x2111 – ltc@sccmail.org
- LTC Spanish x2112 – ltc@sccmail.org
- SHINE Highlands,Hardee, Other x2104 – shine.users@sccmail.org
- SHINE Hillsborough x2101 – shine.users@sccmail.org
- SHINE Manatee x2103 – shine.users@sccmail.org
- SHINE Polk x2102 – shine.users@sccmail.org
- SHINE Spanish x2650 – shine.users@sccmail.org
Filters are set up in some of these shared accounts to move new notifications into applicable labels off to the left as to not interfere with other messages which appear in these shared Google accounts.
From a call queue manager’s Avaya phone (physical or cloud or cloud phone), these are the codes you can dial to monitor one of your agent’s calls:
Press Star (*) and then 80 – Silent Monitoring (you can hear the call, but no one can hear you)
Press Star (*) and then 81 – Whisper/Coach (you can hear the call and only the specialist can hear you)
Press Star (*) and then 82 – Barge (you can hear the call and both parties can hear you)
Press Star (*) and then 83 – Take Over (you and the caller will only be on the call; specialist exits)
For official diagrams and for more information, please click on the link below:
https://onecare.avaya.com/AvayaCloudOffice/kb/public/DOCS100750&viewlocale=en_US
All ADRC and SHINE call queue managers have been provided with a license to the RSI Shadow platform. Each manager was set up with their own department dashboards. If you are a call queue manager and do not have access to the RSI Shadow system, please reach out to MIS@sccmail.org.
We’ve uploaded the initial RSI training video up on Google Drive, and it can be played by clicking here.
Note that the above link has only been made accessible to SCC employees. If you work for another agency, etc., please request access to this video by emailing MIS@sccmail.org.
Unfortunately we confirmed with Avaya Support on 4/29/2021 that only one DND status is available; simply on or off DND 🙁
We ask that you request assistance from MIS first as we may know the answers to your Avaya questions; however, you can reach out to Avaya directly if MIS is either unavailable or if MIS recommends that you do so. Here are the support options Avaya has provided us:
- Send an email to ACOSupport@Avaya.com
- Go to https://onecare.avaya.com/AvayaCloudOffice, login with your Avaya credentials, and then submit a support ticket.
- Call Avaya at 1-866-AVAYA-45
Avaya live technical support is available from 8am-8pm ET.
